Tested on: NT 3.51, NT 4 (all versions and SPs), Windows 2000 (all versions & SPs), Windows XP (all versions, also SP2 and SP3), Windows Server 2003 (all SPs), Windows Vista 32 and 64 bit (SP1 also), Window 7 (all variants). Some also say that it works on Windows Server 2008 too.
If used on users that have EFS encrypted files, and the system is XP or Vista, all encrypted files for that user will be UNREADABLE! and cannot be recovered unless you remember the old password again. If you don't know if you have encrypted files or not, you most likely don't have them (except maybe on corporate systems).
Follow the steps for resetting your password:
1) Boot your computer from Hiren's BootCD. Follow the steps in change the boot order in bios document if you are having problem to do that.
2) With Up & Down keys select "Dos BootCD" and press Enter on the main menu of Hiren's BootCD.
 3) And then enter "Password & Registry Tools ..."
 4) Nextly enter "Offline NT/2000/XP/Vista/7 Password Changer"
 5) Wait for Offline NT Password & Registry Editor to Load
 On this screen you'll see is several lines of text that quickly run down the screen. You don't need to do anything here. Wait it to load
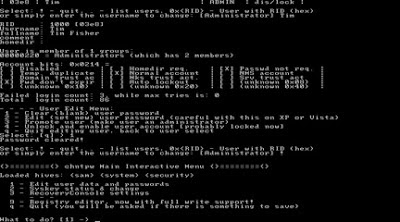
 6) Choose the Correct Hard Drive Partition
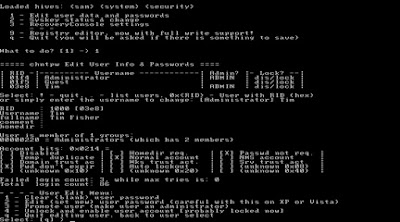

Assuming there weren't any problems, you should see a Password cleared! message after entering 1 in the previous step.
Type ! to quit editing user and then press ENTER.
Important: You must confirm these changes in a later step before they are actually complete. If you quit Offline NT Password & Registry Editor now then the password reset will not take place!.
7) Type q to Quit Offline NT Password & Registry Editor
 Enter q and then press ENTER to quit the Offline NT Password & Registry Editor registry editing tool.
Important: You're still not done! You need to confirm your password reset change in the next step before it will take effect.
8) Type y and then press ENTER to confirm Password Reset Changes
 At the Step FOUR: Writing back changes menu, Offline NT Password & Registry Editor asks if you want to write file(s) back.
Type y and then press ENTER.
You should see an EDIT COMPLETE message appear on screen. If you do, it means that Offline NT Password & Registry Editor has written the password changes to your computer!
9) Confirm That You're Finished Using Offline NT Password & Registry Editor
 Offline NT Password & Registry Editor gives you an option here to rerun the program. If you've been following along with this guide and everything seems to have worked properly then there's little reason to repeat anything.
Press ENTER to confirm the default option of not rerunning the password reset.
10) Remove the Offline NT Password & Registry Editor Disc and Restart the Computer
 That's it! You've just completed the entire Offline NT Password & Registry Editor password removal process.
Note: If you receive a "job control turned off" or a "can't access tty" error, don't worry. As long as the EDIT COMPLETE confirmation message was posted to the screen after you confirmed the password reset changes then your password was successfully reset. You should still be able to see the confirmation on the screen at this point.
Remove the Offline NT Password & Registry Editor disc from your CD/DVD drive and then manually reset your computer.
In the next step, you'll finally get to logon to Windows without entering a password!
Now that your password has been removed using Offline NT Password & Registry Editor, no password is required to log on to Windows. If you are the only user on your computer, Windows will boot all the way to the desktop on the next reboot and will skip the logon screen altogether.
If you're on a multi-user computer (as many families are), the logon screen will still appear after starting Windows but when you click on the user that had the password removed, you will not be prompted for a password and will instead enter Windows automatically.
Having a secure password is important so please don't continue to use Windows without one. As soon as you've gained access to your computer again, configure a new password - one you can remember a little easier!
NOTE : this tutorial is only for educational purpose..
If used on users that have EFS encrypted files, and the system is XP or Vista, all encrypted files for that user will be UNREADABLE! and cannot be recovered unless you remember the old password again. If you don't know if you have encrypted files or not, you most likely don't have them (except maybe on corporate systems).
Follow the steps for resetting your password:
1) Boot your computer from Hiren's BootCD. Follow the steps in change the boot order in bios document if you are having problem to do that.
2) With Up & Down keys select "Dos BootCD" and press Enter on the main menu of Hiren's BootCD.


Assuming there weren't any problems, you should see a Password cleared! message after entering 1 in the previous step.
Type ! to quit editing user and then press ENTER.
Important: You must confirm these changes in a later step before they are actually complete. If you quit Offline NT Password & Registry Editor now then the password reset will not take place!.
7) Type q to Quit Offline NT Password & Registry Editor

Important: You're still not done! You need to confirm your password reset change in the next step before it will take effect.
8) Type y and then press ENTER to confirm Password Reset Changes

Type y and then press ENTER.
You should see an EDIT COMPLETE message appear on screen. If you do, it means that Offline NT Password & Registry Editor has written the password changes to your computer!
9) Confirm That You're Finished Using Offline NT Password & Registry Editor

Press ENTER to confirm the default option of not rerunning the password reset.
10) Remove the Offline NT Password & Registry Editor Disc and Restart the Computer

Note: If you receive a "job control turned off" or a "can't access tty" error, don't worry. As long as the EDIT COMPLETE confirmation message was posted to the screen after you confirmed the password reset changes then your password was successfully reset. You should still be able to see the confirmation on the screen at this point.
Remove the Offline NT Password & Registry Editor disc from your CD/DVD drive and then manually reset your computer.
In the next step, you'll finally get to logon to Windows without entering a password!
Now that your password has been removed using Offline NT Password & Registry Editor, no password is required to log on to Windows. If you are the only user on your computer, Windows will boot all the way to the desktop on the next reboot and will skip the logon screen altogether.
If you're on a multi-user computer (as many families are), the logon screen will still appear after starting Windows but when you click on the user that had the password removed, you will not be prompted for a password and will instead enter Windows automatically.
Having a secure password is important so please don't continue to use Windows without one. As soon as you've gained access to your computer again, configure a new password - one you can remember a little easier!
NOTE : this tutorial is only for educational purpose..


0 comments:
Post a Comment