+91
Showing posts with label Tutorials. Show all posts
There are different ways to format a PC depending on whether you have an original disc of whatever operating system you are using, or you don’t. In the absence of an original Windows (or Ubuntu or any other operating system) disc, you must create a bootable disc so that you can reinstall the operating system once all system files have been removed. Using licensed software is highly recommended not just because of piracy but also considering the advantages of getting free upgrades whenever there is a security or bug-correcting update. Windows makes it easy for its users to format their computer while running windows, by providing step-by-step user-friendly instructions. This can be found by opening Control Panel -> Administrative Tools -> Computer Management -> Storage -> Disc Management. When this window is open, right click on any folder that you wish to format and select the “Format” option. Choose “NTSC” from the drop down menu that allows you to choose the file system. If you intend to format all the folders, remember to format the folder in which the operating system is installed, only at the last when all other folders have been formatted. Technically, formatting doesn’t physically remove the data stored on your hard-disc. All memory locations are freed so that they can be overwritten. This allows us to be able to recover information even from computers that have been formatted unless they have been formatted by techniques that are meant to clear all evidence. Certain software can replace all memory locations with random characters after formatting. Data become irrecoverable from computers that have been formatted several times and junk data is copied between each formatting session.
Formatting A Computer
  • The following steps are useful to format your computer when you don’t have an original disc of the required operating system; however, creating a bootable disc is indispensable. If you do format your computer through “DOS” without having a bootable disc, your computer will be useless until you install some operating system through DOS.
  • If you don’t have a bootable disc then you need to make one. You can download the required files online and copy them onto a floppy or CD. Files can be directly copied onto a floppy but if you intend to burn a CD, you’ll need to run the software that copies the required files onto your CD and select the option, “Make this CD bootable”.
  • The next step is to reconfigure your “BIOS” settings such that it will boot from this new bootable device when the system turns on. As soon as you turn on your computer, the computer will run a basic set of instructions stored in the ROM; this is known as “bootstrap algorithm”. Immediately after there’ll be a line that says “Press ___ key to enter BIOS”. The key that you need to press depends on the CPU. Some computers require the “F1” or any other function key to be pressed while others may ask for the “Delete” key to be pressed; whatever it needs will be displayed onscreen. When you press that required key a blue screen will appear on screen where you can adjust several hardware and software settings. Go to the BIOS settings tab and change the primary bootable device to floppy or CD, depending on your bootable disc.
  • When you save the settings and exit the blue screen, your computer will restart again. Make sure to insert your bootable disc before your computer starts so that it can boot through this device when it starts. If you’re using DOS, you will need to type the command “format C:” (considering your operating system is installed on C drive). As said earlier, always format all other drives before you format the drive that the operating system is stored on.
After formatting, your computer will be free from all virus, trojans, worms, malwares and spywares after formatting; hence it may work faster. The only disadvantage is that you will lose all your data and must reinstall all application software again.
Tested on: NT 3.51, NT 4 (all versions and SPs), Windows 2000 (all versions & SPs), Windows XP (all versions, also SP2 and SP3), Windows Server 2003 (all SPs), Windows Vista 32 and 64 bit (SP1 also), Window 7 (all variants). Some also say that it works on Windows Server 2008 too.

If used on users that have EFS encrypted files, and the system is XP or Vista, all encrypted files for that user will be UNREADABLE! and cannot be recovered unless you remember the old password again. If you don't know if you have encrypted files or not, you most likely don't have them (except maybe on corporate systems).

Follow the steps for resetting your password:


1) Boot your computer from Hiren's BootCD. Follow the steps in change the boot order in bios document if you are having problem to do that.
2) With Up & Down keys select "Dos BootCD" and press Enter on the main menu of Hiren's BootCD.
3) And then enter "Password & Registry Tools ..."
4) Nextly enter "Offline NT/2000/XP/Vista/7 Password Changer"
5) Wait for Offline NT Password & Registry Editor to Load
 On this screen you'll see is several lines of text that quickly run down the screen. You don't need to do anything here. Wait it to load
6) Choose the Correct Hard Drive Partition


Assuming there weren't any problems, you should see a Password cleared! message after entering 1 in the previous step.

Type ! to quit editing user and then press ENTER.
Important: You must confirm these changes in a later step before they are actually complete. If you quit Offline NT Password & Registry Editor now then the password reset will not take place!.
7) Type q to Quit Offline NT Password & Registry Editor
Enter q and then press ENTER to quit the Offline NT Password & Registry Editor registry editing tool.
Important: You're still not done! You need to confirm your password reset change in the next step before it will take effect.
8) Type y and then press ENTER to confirm Password Reset Changes
At the Step FOUR: Writing back changes menu, Offline NT Password & Registry Editor asks if you want to write file(s) back.

Type y and then press ENTER.
You should see an EDIT COMPLETE message appear on screen. If you do, it means that Offline NT Password & Registry Editor has written the password changes to your computer!
9) Confirm That You're Finished Using Offline NT Password & Registry Editor
Offline NT Password & Registry Editor gives you an option here to rerun the program. If you've been following along with this guide and everything seems to have worked properly then there's little reason to repeat anything.

Press ENTER to confirm the default option of not rerunning the password reset.
10) Remove the Offline NT Password & Registry Editor Disc and Restart the Computer
That's it! You've just completed the entire Offline NT Password & Registry Editor password removal process.

Note: If you receive a "job control turned off" or a "can't access tty" error, don't worry. As long as the EDIT COMPLETE confirmation message was posted to the screen after you confirmed the password reset changes then your password was successfully reset. You should still be able to see the confirmation on the screen at this point.

Remove the Offline NT Password & Registry Editor disc from your CD/DVD drive and then manually reset your computer.

In the next step, you'll finally get to logon to Windows without entering a password!
Now that your password has been removed using Offline NT Password & Registry Editor, no password is required to log on to Windows. If you are the only user on your computer, Windows will boot all the way to the desktop on the next reboot and will skip the logon screen altogether.
If you're on a multi-user computer (as many families are), the logon screen will still appear after starting Windows but when you click on the user that had the password removed, you will not be prompted for a password and will instead enter Windows automatically.
Having a secure password is important so please don't continue to use Windows without one. As soon as you've gained access to your computer again, configure a new password - one you can remember a little easier!

NOTE : this tutorial is only for educational purpose..

SQl injection is a vulnerability that allows an attacker to influence the queries that are passed to the back-end database.It has been present since the time databases have been attached to the web applications.However, the main credit of bringing SQL injection into public notice goes to Rain Forest Puppy who in 1998 wrote an article on it and in 2000 he wrote another article describing how he hacked one of the popular website on the internet using SQL injection.

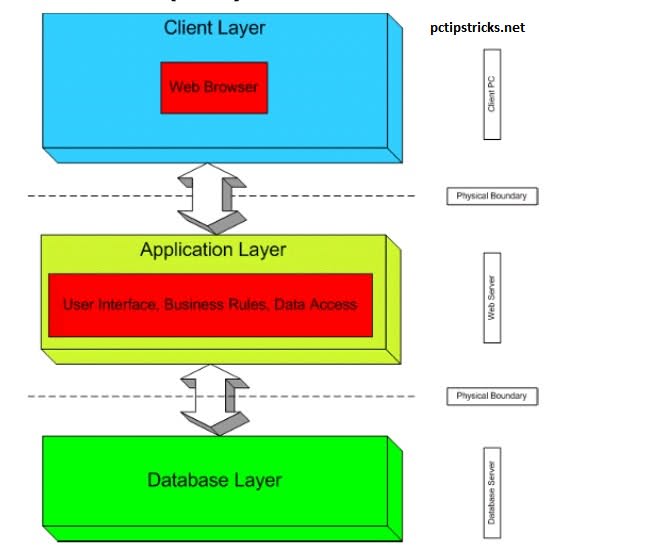
Before understanding the how SQL injection attacks we need to understand the Simple Three Tier Architectureor a Four Tier Architecture.This will clearyour basics and give you a rough idea of how database-driven web applications work.

Three Tier Architecture

In a simple three tier datbase-driven architecture the three layers that are used are:-

Presentation Tier(Browsers)
Logic Tier
Storage Tier(Database)

The three tier architecture follows a linear relationship i.e Presentation Tier connects to the Logic Tier and theLogic Tier connects to the Storage Tier

Presentation Tier <–> Logic Tier <--> Storage Tier
To understand this consider an example


Suppose you connect to the http://www.website.com using his web browser.This is your presentation tier.Now the web server residing in the logic tier will load the script for the entered url and will pass it to the scripting engine which will parse and execute the script.It will also open a connection to the database i.e Storage Tier .It will perform the queries and the data from the database is transferred to the logic tier which will now convert into HTML which is rendered by the Browser.

Four Tier Architecture

In Four Tier Architecture an layer of Application Server is inserted between aweb server and the database.

Presentation Tier(Browsers)
Logic Tier
Application Tier
Storage Tier(Database)

28hog09 Basics And Working of SQL Injection Attacks


In four tier architecture the connection to the database is opened by application server which has Application Programming Interface (API) that implements the business logic before transferring the data to the Logic tier.

Presentation TierLogic Tier Application Server Storage Tier

Working Of SQL Injection

SQL injection can be used using various methods.In this tutorial I will explain to the basic concepts behind the SQL injection.

Suppose you are on a shopping site and you have selected the option of showing all the accessories that costless then 200$ and its Url is like

http://www.shoppingsite.com/products.php?val=100

To test this website for SQL injection try appending your SQl injection commands in the val parameter ‘OR ‘1’=’1

http://www.shoppingsite.com/products.php?val=100’OR’1’=’1

If the above injection works and shows the list of all the accessories then the website is vulnerable to this type of SQL injection

This means that at the backend the script will be executed as shown:

SELECT *

FROMProductstbl

WHEREPrice<’200.00’ OR ‘1’=’1’ ORDER BYProductdescription As the condition 1=1 so this will give you list of all the products How this SQL injection Attack Can Be Harmful Suppose a website uses the following url for logging into admin panel http://www.website.com/cms/login.php?username=saini&password=go now if the above website is vulnerable to the SQL injection as mentioned in the above example then by entering any username and password in the url you can login http://www.website.com/ms/login.php?username=dnt&password=dnt’OR’1’=’1 so you will just login without valid username and password to the admin panel of a website. This tutorial is becoming very long so I will explain the rest and the best methods of SQL injection in my next post On SQL injection.

Hi friend! Are you interested to learn Java programming online? Then this is the perfect place to learn it easily and quickly. Those who are not related to programming please kindly skip this post.

Actually I planned to introduce a step by step tutorial on Java at the beginning of this year itself but unfortunately the idea got postponed due to my freelancing projects as well as due to personal problems and finally I got time to introduce this tutorial at the end of the year .

Before going to start the tutorial let us discuss who should learn Java? If you want to learn Java programming I strongly recommend you to have programming skills in C language. And it may be much better if you know a bit of C++ also. But don’t think that if you don’t know C you cannot learn Java!. It’s possible to jump directly to Java but you cannot enjoy the way a C programmer is going to catch the concept. Hope you understand my point.

And finally regarding this tutorial this is purely for beginners. I am planning to write at least thirty articles on Java. If this is not sufficient I will expand it up to 45. People who are well versed with Java can also go through this tutorial because I am not going to cover the concept in a way you are going to find in books. Everybody will have a different view on the language. So my view may be a bit different and I hope you may like this!

I was much inspired by a quotation given by creator of perl language Larry Wall. He says:

“A language is not worth knowing unless it teaches you to think differently.”

So I will always try to present the concept by keeping the above quote in mind. Each day a new post will be posted at morning 9 AM. I will try to be online at this time so that if you have any queries regarding the concept you can clarify them instantly. Anyway you can also post your comments at a later time and I will provide the solution with in 24 hours.

All the links will be available in this post so that you can refer to the tutorial from one place easily. So my dear friend try to attend for tomorrow session online at sharp 9 AM .

One more thing! while posting comments do address me simply Naresh or Naresh Bharat. No need to call as Sir. I actually feel a lot inconvenient when somebody refer me as sir. Because I believe that a teacher is a life long student and a student is a life long learner. I too expect to receive some thing new from you. Hope you don’t disappoint me!